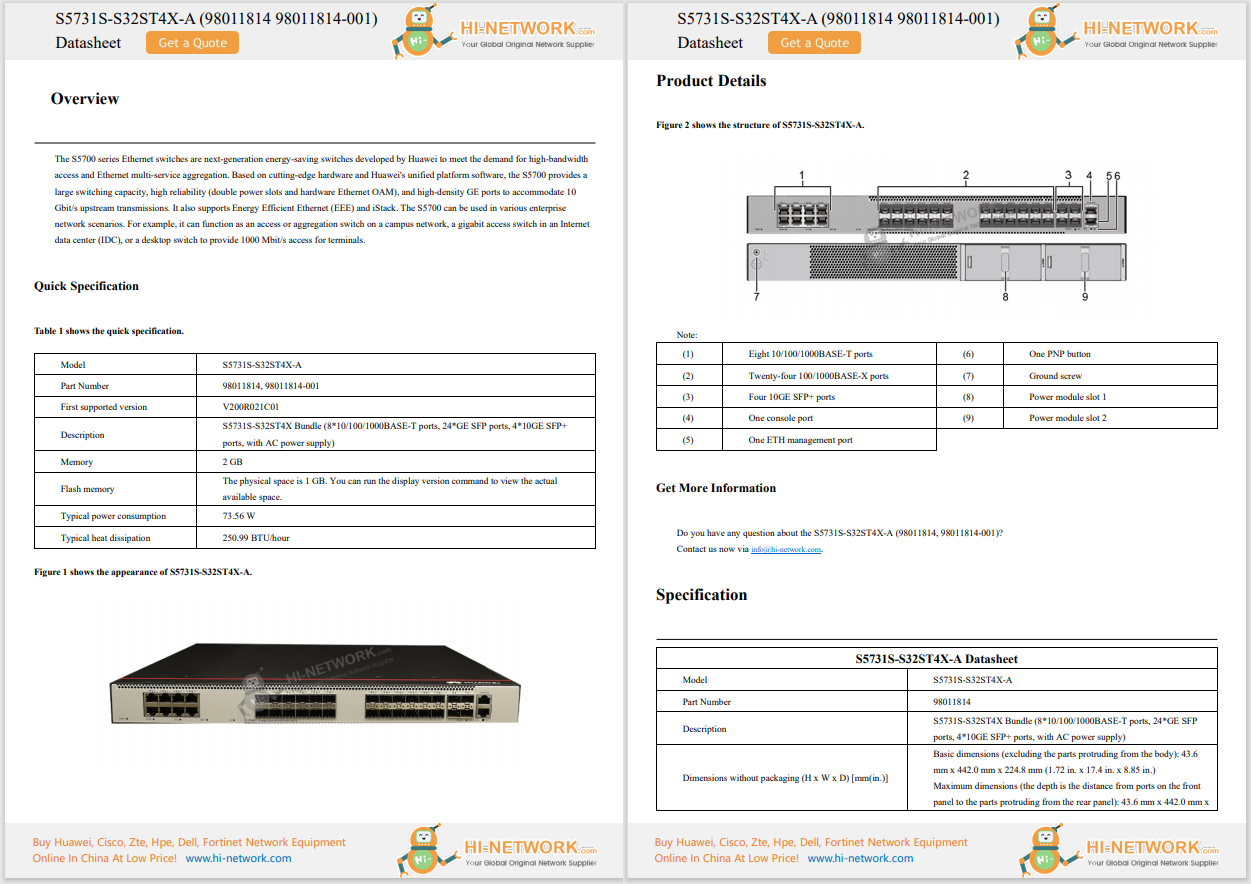
Register now for better personalized quote!


 Apple
Apple I connect to a lot of different networks. At home, I have three different LANs to choose from, which I use depending on my needs. For example, I have a general-purpose network and one that I use for the deployment of containers and the like.
Apple's Mac lineup can be confusing as the company transitions from Intel processors to its own Apple Silicon processors. But we're here to help.
Read nowFor the general-purpose network, I can just have MacOS accept an IP address from the DHCP server. However, for the container network, I prefer assigning a static IP address.
Is this possible?
It certainly is. With the help of MacOS Network Locations, you can assign specific configurations for specific networks (or locations) and even define a particular network you want to connect to within a location.
Let me show you how it works.
Also: How to manage SSH connections on MacOS with Termius
The only thing you'll need is a device running an updated version of MacOS. This feature works with both wired and wireless connections.
Click the Apple menu at the top right of your display and select System Preferences from the menu.
From within System Preferences, click the Network icon to open the Network section.
From the Location drop-down, select Edit Locations. In the resulting pop-up, click + (the plus sign). You will be prompted to name the location, so type a new name and hit Enter on your keyboard, and then click Done.
Creating a new Network Location in MacOS Monterey.
Image: Jack WallenMake sure to select the new location you created from the Location drop-down. Click Advanced to open the location configuration window, where you can configure the location to meet your specific needs. For example, you can select the network to be used and then configure that network for a static IP address using the Cloudflare DNS servers.
Configuring a network for the new location in MacOS.
Image: Jack WallenOnce you've configured the location exactly how you need it, click Apply to save everything.
After you've created all of the network locations you need, MacOS makes it very easy to switch between them. All you have to do is click the Apple menu > Location > [Location name] (select the name of the location you want to use).
Switching between network locations is a few mouse clicks away.
Image: Jack WallenAnd that's all there is to creating and using network locations in MacOS. If you need to get specific with how your MacOS device interacts with a network, this is a great way to go. Just remember, however, if you move from the current location, you'll want to select another. For example, if you have one location for home and one for work, your machine might have trouble connecting to that work LAN with the home settings.
Fortunately, you are now empowered to more easily make that switch.
 Hot Tags :
Services & Software
Operating Systems
Mac OS
Hot Tags :
Services & Software
Operating Systems
Mac OS
Register Email now for Weekly Promotion Stock
100% free, Unsubscribe any time!
Add 1: Room 605 6/F FA YUEN Commercial Building, 75-77 FA YUEN Street, Mongkok KL, HongKong Add 2: Room 405, Building E, MeiDu Building, Gong Shu District, Hangzhou City, Zhejiang Province, China
Whatsapp/Tel: +8618057156223 Tel: 0086 571 86729517 Tel in HK: 00852 66181601
Email: [email protected]
 English
 Pусский
 Français
 Español
 Português