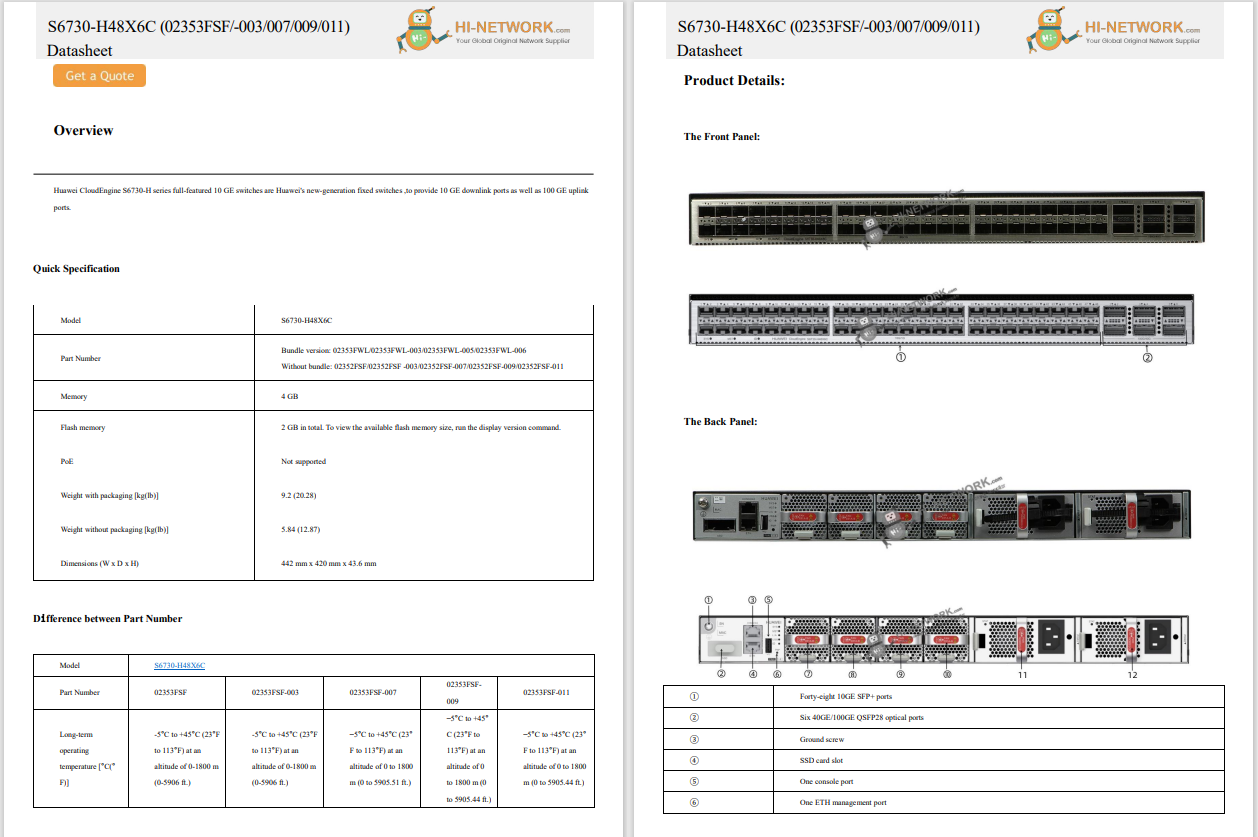
Register now for better personalized quote!


I'm rough with my gear, so I tend to use screen protectors to give my gear more of a fighting chance.
But screen protectors can be a massive pain to apply. There have been plenty of times when, through being in a rushorbeing careless, I've ended up with dust, car hair, or air bubbles trapped beneath the screen protector. And while this doesn't affect the overall performance of the screen protector, it looks awful.
And you're looking at it every time you use the device. And you'll be annoyed by those imperfections.
I needed to add a screen protector to myDJI RC Pro controller , so I thought I'd bring you along to show you how I do it. This is not a smartphone or a tablet, but the process is the same.
DJI RC Pro display needs a good clean
Screen protector kit I'm using
I'll be testing these robustness claims soon...
2. Good screen protectors will come with things to clean your screen with. Use them. Don't just give is a wipe with a t-shirt and hope that's enough. You'll end up hating the you of the past that took that shortcut.
The kit I purchased came with wet and dry wipes, stickers for grabbing dust and hair, and alignment stickers to help get the screen protector on straight.
Kit contains everything you need
3. Check to see if the screen protector fits before starting the process. Check the alignment and use the alignment stickers to create a hinge that will allow you to remove the backing off the screen protector and drop it onto the display.
Aligning the screen protector
4. Clean the screen thoroughly and use the sticker to dab off any remaining detritus. Don't rush this step. The display needs to be as clean and dry and free of detritus as possible.
Cleaning the display
5. With the screen clean, peel off the backing, check again for any dust or debris (use the dabbing sticker to remove it, don't blow as that will make a mess) and then flip the screen protector down onto the display.
Peeling the backing
6. Use your fingers to walk the air bubbles to the edges where they should disappear. Work slowly from the middle outwards to remove all the air bubbles. It might take time, so be patient.
Walking the air bubbles to the edge
And eventually you're done.
Finished!
If you do mess up, then hopefully you've bought a kit with multiple screen protectors. Learn from whatever mistake you made and try again!
I was also curious how tough the screen protector was, especially when it came to scratch-resistance.
Turns out it's very hard to scratch or even pierce.
But it's not indestructible.
 Hot Tags :
Smart Office
Office Hardware & Appliances
Hot Tags :
Smart Office
Office Hardware & Appliances
Register Email now for Weekly Promotion Stock
100% free, Unsubscribe any time!
Add 1: Room 605 6/F FA YUEN Commercial Building, 75-77 FA YUEN Street, Mongkok KL, HongKong Add 2: Room 405, Building E, MeiDu Building, Gong Shu District, Hangzhou City, Zhejiang Province, China
Whatsapp/Tel: +8618057156223 Tel: 0086 571 86729517 Tel in HK: 00852 66181601
Email: [email protected]
 English
 Pусский
 Français
 Español
 Português