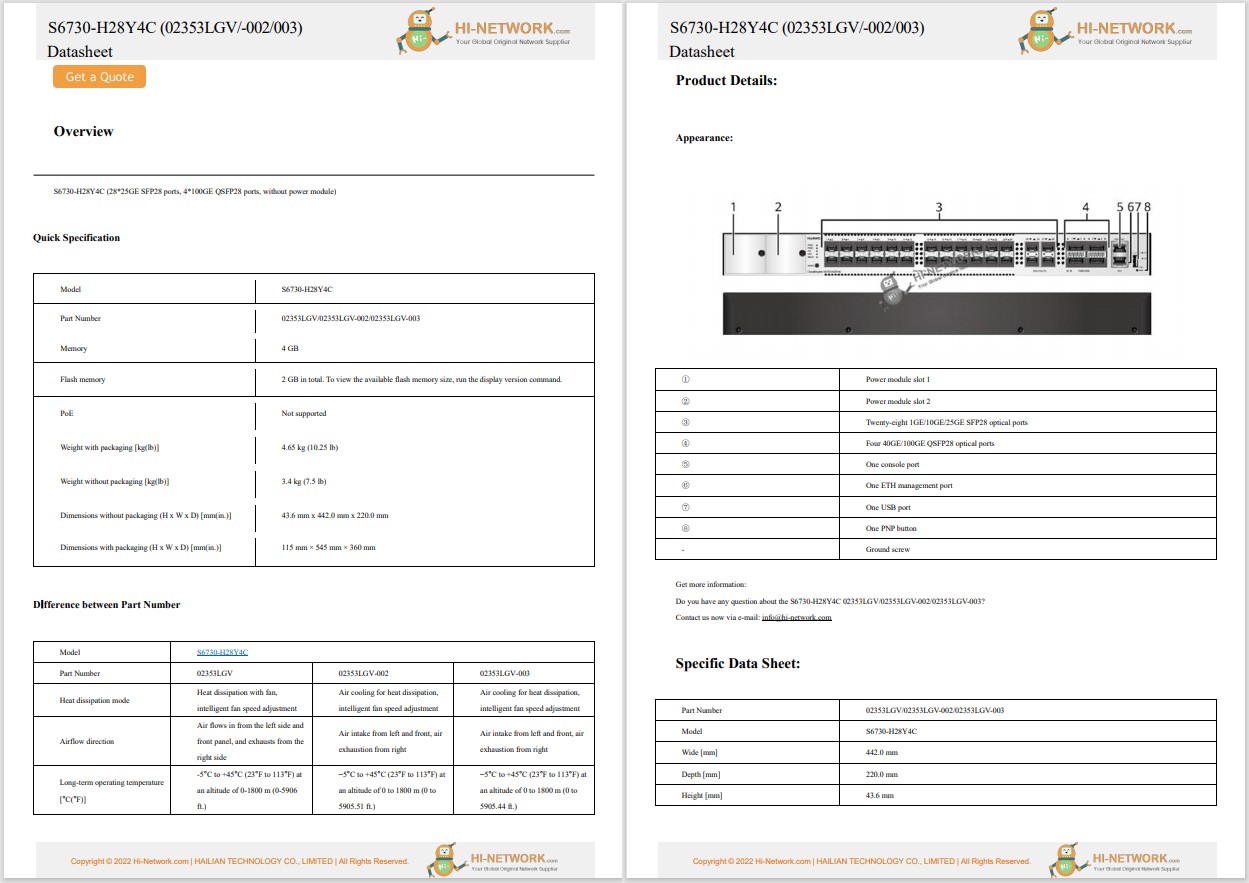
Register now for better personalized quote!


How do you test Windows 11 for compatibility with essential apps without putting your work at risk? Simple: Use the built-in Hyper-V platform on your Windows 10 PC to create a virtual machine and install Windows 11. You can run your existing apps and services in that virtual machine without risking the integrity or stability of your "real" PC.
Windows 11 is an upcoming release of Microsoft's flagship operating system and the successor to Windows 10.
Read nowCreating a new virtual PC is easy, assuming your PC satisfies the requirements. You must be running a 64-bit business edition of Windows Pro or Enterprise edition; the Home edition does not include Hyper-V support. In addition, your CPU and associated hardware must meet specific requirements. (For this walkthrough, I assume you are running Windows on a PC with a supported Intel or AMD CPU; the rules for Arm-based CPUs are different.) Most modern CPUs pass this test with ease. (For full details, see "Windows 10 tip: Find out if your PC can run Hyper-V.")
You also need enough physical hardware resources to devote to your virtual machine. I recommend at least 8 GB of memory, along with enough unused local storage to hold a full installation of Windows, apps, and checkpoints (32 GB should be sufficient).
Finally, you need a copy of the Windows 11 installation files in ISO format. You can get that file from Microsoft's Download Windows 11 page by choosing the Download Windows 11 Disk Image (ISO) option.
With those preliminaries out of the way, you're ready to get started. Note that all of the steps below work exactly the same on Windows 10 and Windows 11.
1. Click Start and type Hyper-V in the search box.If Hyper-V is already enabled, open the Hyper-V Manager utility and skip to the next step. If you see the Turn Windows features on or off option, click to open the Windows Features dialog box, choose the Hyper-V option, and restart your PC to continue.
2. In Hyper-V Manager, make sure your PC's name is selected in the center pane and then, in the Actions pane on the right, click New > Virtual Machine.
3. In the New Virtual Machine wizard, use the following settings:
 Hot Tags :
Register Email now for Weekly Promotion Stock
100% free, Unsubscribe any time!
Add 1: Room 605 6/F FA YUEN Commercial Building, 75-77 FA YUEN Street, Mongkok KL, HongKong Add 2: Room 405, Building E, MeiDu Building, Gong Shu District, Hangzhou City, Zhejiang Province, China
Whatsapp/Tel: +8618057156223 Tel: 0086 571 86729517 Tel in HK: 00852 66181601
Email: [email protected]
 English
 Pусский
 Français
 Español
 Português