Register now for better personalized quote!


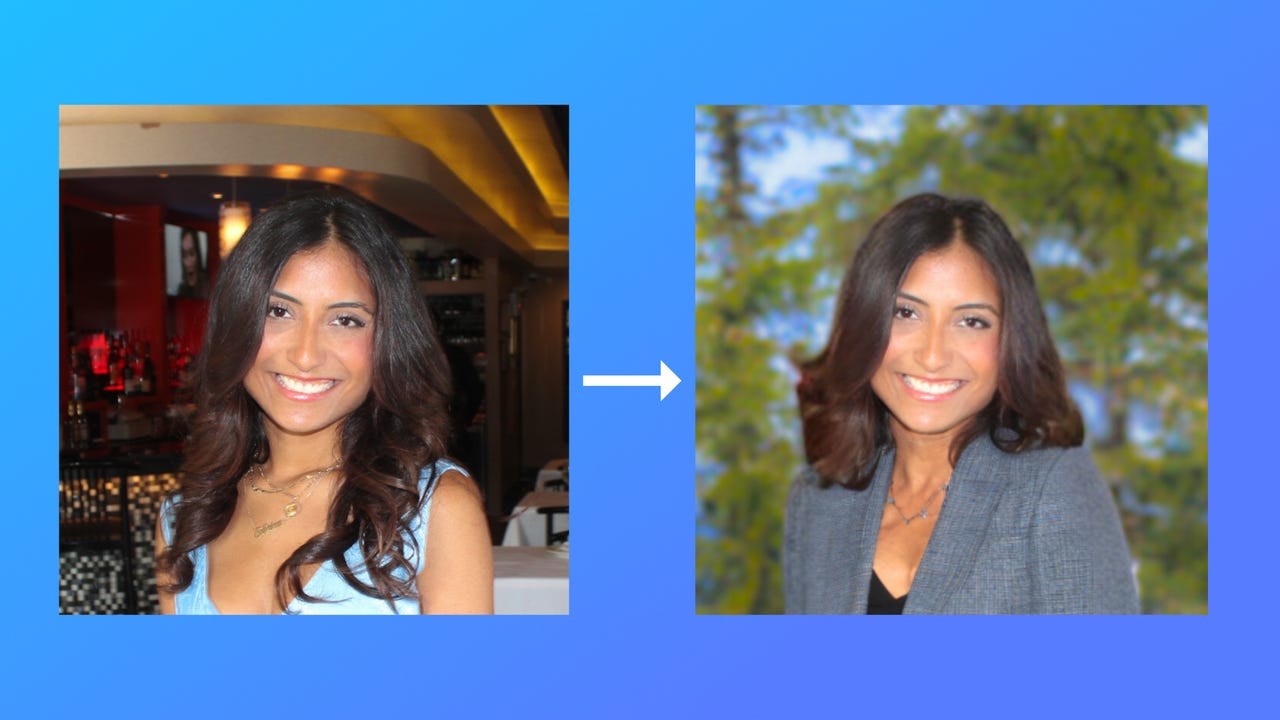
It doesn't matter what you are wearing in the photo or what the background is -- with the help of AI, you can transform it all.
Sabrina Ortiz/Whether you need to set up your LinkedIn profile for the first time, add a photo to your Slack account, or simply want to revamp your website, a professional headshot is always a good thing to have.
However, hiring a photographer to take a professional headshot can get expensive. Plus I, like many others, often dislike how I look in those posed pictures where I'm trying to look my best. Instead, I prefer the more natural and candid photos taken by my friends and family.
Also: How to use ChatGPT to write a cover letter (and why you should)
Canva's Magic Edit tool helps circumvent both issues by creating a perfect headshot from an image you already have and like.
It doesn't matter what you are wearing in the photo or what the background is -- with the help of AI, you can transform it all.
Before you can get started with your project, you will need to become aCanva Pro member -- though Canva does offer a 30-day free trial.
The Magic Edit tool, as well as other AI-powered design tools, such as Magic Eraser and Magic Write, is limited to Pro users at the moment.
Also: How to use Magic Eraser on the Google Pixel
The membership costs$120 per year for an individual account and includes other perks, such as image editing, stock photos, premium templates, and more.
Once you sign up -- or initiate the free trial -- and are signed in, you can get started on creating your headshot. Here's how you do it.
As soon as you sign into Canva, you will be brought to its homepage, which showcases different projects and templates you can create.
Although you can create this project by selecting any blank template, I recommend clicking on "Create a design" in the upper right-hand corner and choosing the "Instagram Post" option.
Also: The best AI art generators
That option will bring you to a square, PNG template that is perfect for a headshot.
Once you pick the picture you would like to transform into your headshot, click on the purple "Upload files" button on the left-hand bar and select your photo.
As a reminder, it does not matter what you are wearing in the photo or what the background is, as you can edit both.
Once you upload the image, you can click on the image.
Also: How to use DALL-E 2 to turn your creative visions into AI-generated art
Click on the "Edit photo" button in the top bar and then click on "Magic Edit" under the tools category.
If you want to change the background, your outfit, or any other image component, all you have to do is drag your cursor over the area you want to change and fill it in.
For example, I wanted to change the dress in my photo, so I highlighted it in its entirety.
In the text box, you can type in exactly what you'd like the highlighted part of your photo to be replaced with.
For example, I typed in, "blouse with a blazer" for my photo since that is what I wanted to be wearing instead.
Also: How to use ChatGPT to build your resume
Once you are done with your description, you can hit the purple "Generate" button and watch the magic happen.
Canva will generate four options for your image based on your text prompt.
If none of the options are to your liking, you can hit "generate new results" to explore more.
Also: I tested out an AI art generator and here's what I learned
Once you find the option you like the most, all you have to do is click on it and you are set!
Since the background also needed some editing in my photo, I just repeated the same steps to get more of a blurred, nature background.
Disclaimer:Using AI-generated images could lead to copyright violations, so people should be cautious if they're using the images for commercial purposes.
 Hot Tags :
Artificial Intelligence
Hot Tags :
Artificial Intelligence
Register Email now for Weekly Promotion Stock
100% free, Unsubscribe any time!
Add 1: Room 605 6/F FA YUEN Commercial Building, 75-77 FA YUEN Street, Mongkok KL, HongKong Add 2: Room 405, Building E, MeiDu Building, Gong Shu District, Hangzhou City, Zhejiang Province, China
Whatsapp/Tel: +8618057156223 Tel: 0086 571 86729517 Tel in HK: 00852 66181601
Email: [email protected]
 English
 Pусский
 Français
 Español
 Português