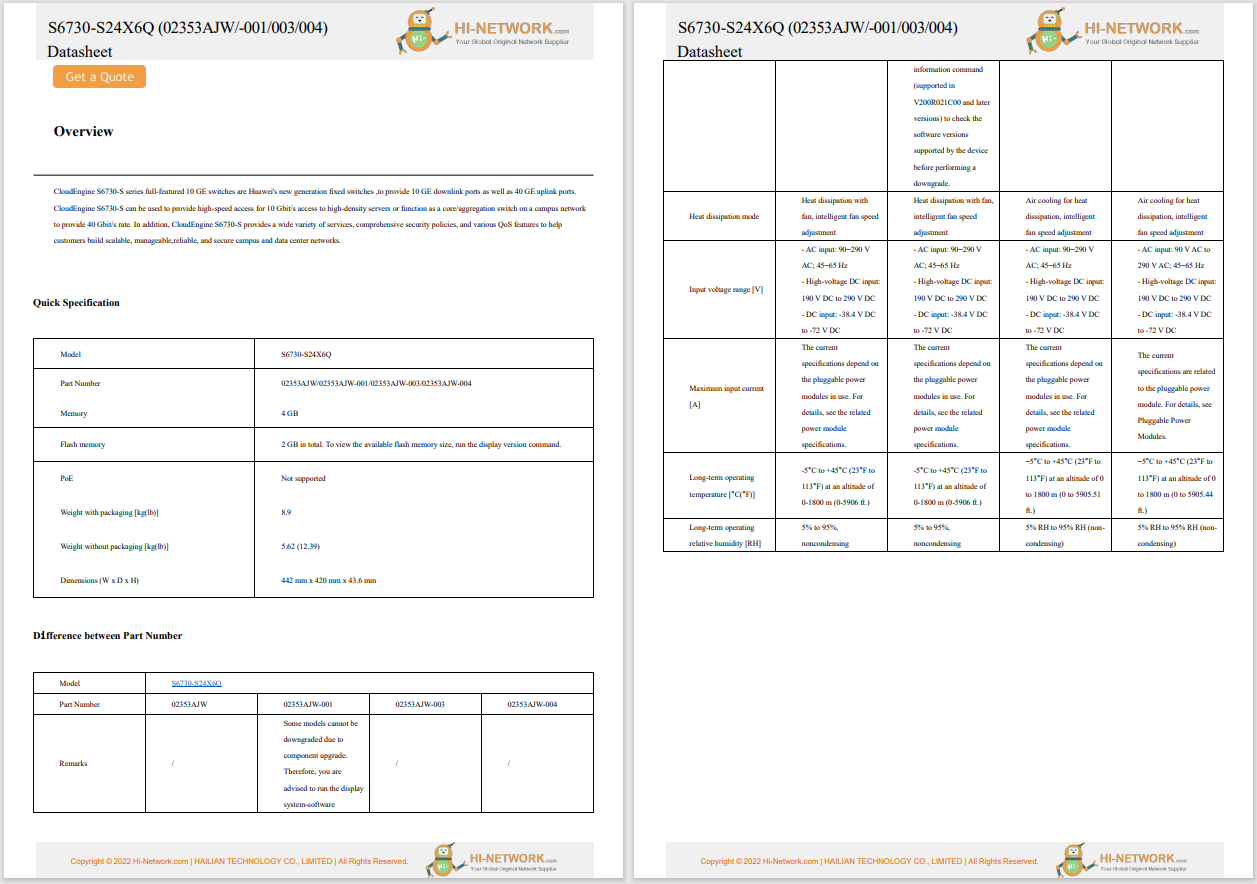
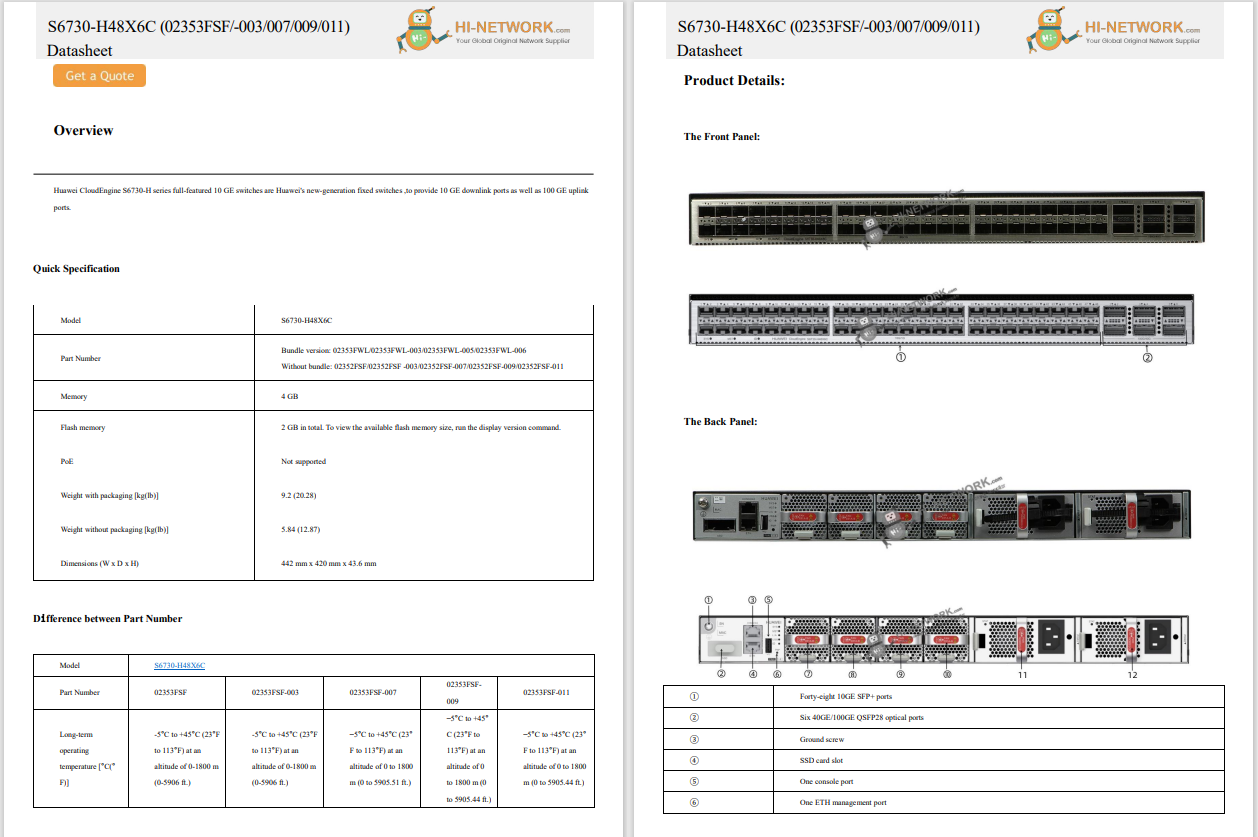
Register now for better personalized quote!


I'm the de facto tech support person for my family and relatives. That means I often get enlisted to fix some snafu with someone's Windows PC, which can entail a hands-on operation. But if I don't have time to visit them to perform the required surgery, I'll use the built-in Quick Assist tool.
Also: How to screen record in Windows 10 or 11
With Quick Assist in Windows 10 and 11, you can remotely connect to another PC to see and control the screen. Quick Assist is easier to use than Microsoft's Remote Desktop, so that's why it's my go-to app for virtual support visits. Plus, the tool can come to the rescue whether you're trying to give or get help.
To conduct a Quick Assist session, you and the other person need to be running Windows 10 or 11. If either of you is still using an older Windows version, you'll have to turn to Remote Desktop or another remote control program.
By default, Quick Assist starts you off by sharing the remote screen, which means the person receiving assistance still needs to navigate the PC. But once you're connected, the person providing the assistance can request control to take over. That person can also use a laser pointer or annotation feature to highlight the screen, open a chat session, and resize the screen. Either of you can pause and then restart the session or leave it entirely.
Also: 7 ways to make Windows 11 less annoying
The process works the same whether you're giving or receiving remote assistance, but for this article, let's assume you're the person giving the help. You'll need a Microsoft-related account to use Quick Assist, either a Microsoft 365 account or an email account with Outlook or Hotmail.
First, set up a phone call with the person you're helping so you can talk to each other throughout the process. Next, you each need to launch the Quick Assist app.
In Windows 10, click the Start button, open the folder for Windows Accessories, and click the shortcut for Quick Assist.
In Windows 11, click the Start button, go to All Apps, and click the Quick Assist shortcut. The Quick Assist window will then pop up.
Helper view (L) and receiver view (R) in Quick Assist.
You'll need permission from the recipient to view and control their PC remotely. To start, click the "Help someone" button. A security code will appear. Speak or otherwise send that code to the recipient, who will then type it into the "Enter code" field under Get Help and click Submit.
The recipient should click the Allow button to allow screen sharing. You should then see the screen of the remote PC in the Quick Assist window on your computer.
If you want to chat with the recipient through Quick Assist, click the Chat button on the top toolbar. A chat window will open on your end. Once you send your message, the recipient can click the Chat button at the top center-right of the screen to read your message and continue the conversation.
Also: How to transfer photos from your Android device to your Windows computer
If the recipient is controlling their own PC, you may want to point them to certain features, settings, or windows on the screen. You can do that using the built-in laser pointer. Click the laser pointer icon on the toolbar, choose a color, and then draw on the screen. When done, click the "Exit Laser Pointer" button.
Another way to draw attention to items on the screen is through annotations. Click the Annotation tool icon on the toolbar. Choose a color and then draw objects or text on the screen to highlight specific actions or areas. Click the "Exit Annotation" button when finished.
If you want to control the remote PC at any point, you'll need to request access. On the top toolbar, click the "Request control" button (visible in the image above step 4). The recipient should click the Allow button, and you'll then be able to control the remote computer. You or the recipient can turn off control whenever you want by clicking the "Cancel control" button.
You can switch between two sizes for the remote screen. Click the "Actual size" button on the toolbar, and the screen will likely zoom into a specific area. Click the same button that now says "Fit to screen," and the screen will resize to its previous dimensions.
Need to take a break from your tech support? You can pause the remote session and then resume it when you return. To do this, either you or the recipient can click the "Pause button" on the toolbar. When you're ready to get back to the support session, the recipient will click the "Resume" button.
You may find you have to reboot the remote PC to resolve the issue. Click the "Restart & reconnect" button on the toolbar. The remote PC will restart back into Windows. The recipient can then launch Quick Assist again, but this time the connection will be automatically re-established.
When you've (hopefully) fixed the technical problem, click the Leave button to exit the session.
 Hot Tags :
Tech
Services & Software
Hot Tags :
Tech
Services & Software
Register Email now for Weekly Promotion Stock
100% free, Unsubscribe any time!
Add 1: Room 605 6/F FA YUEN Commercial Building, 75-77 FA YUEN Street, Mongkok KL, HongKong Add 2: Room 405, Building E, MeiDu Building, Gong Shu District, Hangzhou City, Zhejiang Province, China
Whatsapp/Tel: +8618057156223 Tel: 0086 571 86729517 Tel in HK: 00852 66181601
Email: [email protected]
 English
 Pусский
 Français
 Español
 Português